To film what would like the archive footage in the music video (the narrative section) we started filming on Louis VHS camera as this looked the most authentic. However, the VHS camera we were using is quite old and we thought it would be sensible to have a backup in the event of anything going wrong. So, whilst filming Louis and Gina we used both the VHS camera and the HD camcorder.
We were aware that this we look very different so we intended to edit the footage in after effects to recapture any authenticity that was lost. This was something we all had to look into doing as a group, and so we looked through several YouTube tutorials on how to convert footage and tested this on some VHS footage we had got from a shoot.
Tutorials
Initially, we looked to this tutorial for guidance. This was made of the persons own pre-set package. This package did have a variety of tweakable sliders which we could use to achieve our desired look. We tried some of these effects on our footage but wanted to experiment further to see what else it could possibly look like, so we watched the following tutorial:
This tutorial was very complicated as it was just a list of instructions without any actual video as an example. Also, this tutorial didn't use any sliders and was entirely based on trial and error so the footage turned out very different.
We collated all versions of edited VHS footage to compare it all, especially against the original VHS footage because we were growing keener on the idea of editing HD footage.
However, after viewing all the footage next to each other in a sequence, we realised we actually preferred the authentic VHS footage and would use what we learnt about creating 'fake' VHS footage on after effects as a back-up.
NTLS Self-Titled Digipak Cover

NTLS Self-Titled Digipak Cover
NTLS Website

Right-click the image and select "Open link in new tab" as this will take you to the official NTLS site
Sunday 30 November 2014
Friday 28 November 2014
Kit List
CAMERA UNIT:
Canon Legria HFG30
Go pro
Canon 5D
HDMI cables + Converter
64GB Memory card
PLAYBACK UNIT:
50 inch monitor
15 inch mac book pro
Studio sound system
Stereo Jack to 2 x Xlr box
2 x Extension cables
LIGHTING:
Studio lighting rig
2 x floor lights
1 x turret light
Leapfrog lighting desk
STUDIO:
1 X White Cyclorama
1 x sheet stand
1 x sheet
1 x camera dolly
Footage Review - 28/11/2014
Although a lot of the footage we collected was the same as what we shot the previous Friday, we found security in knowing that we had a wealth of takes to choose from.
We wanted to create some variety with the promo shots so added props like the headphones
and took some more shots of the duo together
We wanted to create some variety with the promo shots so added props like the headphones
 |
| Individual Promo Shot of 'Nathan' with Headphones |
 |
| Dual Shot |
Some of the shots looked good but a lot of them looked very similar. A few of them even had lighting problems which made them look worse than the ones we got before. Though again, because of the sheer amount of photos we managed to take, this small group of bad shots had practically no effect on the project as there were many great pictures which, with some editing, would be perfect for the photo gallery of the website.
Studio Session - 28/11/2014
Being the last session, we had everything we needed to do meticulously planned out to ensure we filmed the footage that we realised we forget to record a couple days ago. This was the core focus of this session. Our precise planning meant we got all recorded footage in just an hour. This allowed us to focus on some promotional shots which will be used on our album cover and website.


Overall it was a successful day, and a nice way to end our studio shoots.
Overall it was a successful day, and a nice way to end our studio shoots.
Wednesday 26 November 2014
Album Cover - First Developments
Before producing the album cover we only made very minor changes to the original design
Changes:
 |
 |
| Light scribing reference |
- One of the internal panels will now have the two members of NTLS sat on the floor dressed in black, then we will use the light scribing technique to create interesting images around them.
- Less of a change, we just remembered to add in in legal trademarks and copyright
- Addition of the record label symbol and the barcode
- A tracklist written on the right hand side of the artists on the back cover
Staying the same:
- The collage of the two artists on the front cover however we decided to have this in grey so it stands out from the forest
- The panoramic forest photo stretching across the front cover
Website - First Developments
This slideshow explains the layout of our website which we drew up, this meant all the group work working from the same ideas.
Saturday 22 November 2014
Footage Review - 21/11/2014
When reviewing the footage from this shoot, we were pleased with the majority of shots as we managed to get the exact standard we had planned, even exceeding our own expectations in some cases. Unfortunately, even with our best efforts to stick to the shootboard and stay focused, we realised that:
Personally, I am really happy with our footage- I feel like it is shaping up to look really stylised and unique and with some closer attention to detail in our final shoot, we will get some really distinct footage which will create a strong image.
- We still didn't get all the shots we wanted e.g. the MS of 'Nathan' against the black background
- The experimental shots did not follow the choreographed routine and so broke the continuity of the studio sections of the video
- There were minor flaws in shots e.g. framing and camera focus
Nevertheless, these issues didn't really cause much concern as we still got a vast amount of different shots and could take note of our errors to rectify them in the final shoot.
The following video shows some of our days footage:
Personally, I am really happy with our footage- I feel like it is shaping up to look really stylised and unique and with some closer attention to detail in our final shoot, we will get some really distinct footage which will create a strong image.
Studio Session - 21/11/2014
This shoot was our longest shoot and in my opinion it ran very smoothly. We had learnt from all the previous organisation mistakes we had made and knew exactly which shots we needed to get. what took longer and how to make sure we have the highest possible standard for each shot.
We all worked around the free time we had before the shoot, setting up lighting and getting into costume, so that we could maximise the time we all had together to shoot.
Our efficient use of time, meant we once again had some time spare to take promo shots aswell:


We all worked around the free time we had before the shoot, setting up lighting and getting into costume, so that we could maximise the time we all had together to shoot.
 |
| Getting ready for the shoot |
Overall, I feel like this was a very successful shoot.
Friday 21 November 2014
Footage Review - 20/11/2014
We were really happy when we reviewed this footage because with the improved costumes and variety of shot styles, the footage was finally at the standard we wanted but had previously been unable to achieve.
Due to experimentation on the shoot with unplanned shots, a couple of flaws emerged when reviewing the footage:
Due to experimentation on the shoot with unplanned shots, a couple of flaws emerged when reviewing the footage:
- We didn't get a MS of the male artist against the black background
- The intuitive shots didn't follow the choreography and so could've potentially ruined the continuity of the routine
- Some shots were off centre and slightly out of focus sometimes; perhaps a result of getting excited over a interesting shot style and thus forgetting basic adjustments
None of these issues posed any threat to the video as we had 2 more shoots left to correct all these errors and come up with better planning to ensure we didn't miss any shots or forget basic quality control. Also, the lack of continuity hardly posed a threat because conventionally, music videos don't try too hard to be continuous.
This is a short compilation of some of the footage we shot on the dayt:
Studio Session - 20/11/2014
After reviewing the footage from the previous shoot, we thought the style of the actual shots itself was quite dull, and although we had a few ideas for different shot types, it still wasn't strong enough for our video. We listened to the song over again and noticed it had a quite a few distinct beats and rhythms which we could play around with, particularly applying some of the theory we had learnt from Carol Vernallys.
The black cyclorama background we had created we be used for MS's, ECU's, CU's and MCU's wearing the white costume to create a very strong contrast. This wouldn't work for LS's or anything wider because the white floor of the studio would show and we wanted the infinity black. It was difficult to find any direct references, but the idea of strong contrasting colours was similar to the video for Hot Chip - Ready For The Floor:
This was our only real reference and it wasn't that similar to what we were trying to achieve so this shoot was quite risky. Looking back, spending some time prior to the shoot making a short reference video and also messing around by inverting the colours on some clips, would have given us more confidence on this shoot. Nevertheless, we mapped out the ideas we had in our heads as best we can, and the shoot did run smoothly.
We also managed to take some promo shots throughout the shoot

The black cyclorama background we had created we be used for MS's, ECU's, CU's and MCU's wearing the white costume to create a very strong contrast. This wouldn't work for LS's or anything wider because the white floor of the studio would show and we wanted the infinity black. It was difficult to find any direct references, but the idea of strong contrasting colours was similar to the video for Hot Chip - Ready For The Floor:
 |
| Strong contrast of yellow and black |
We also managed to take some promo shots throughout the shoot
Saturday 15 November 2014
Footage Review from 13/11/2014 Shoot
We compiled a rough edit which allowed us to see how the real studio footage would look next to the VHS footage for the first time.
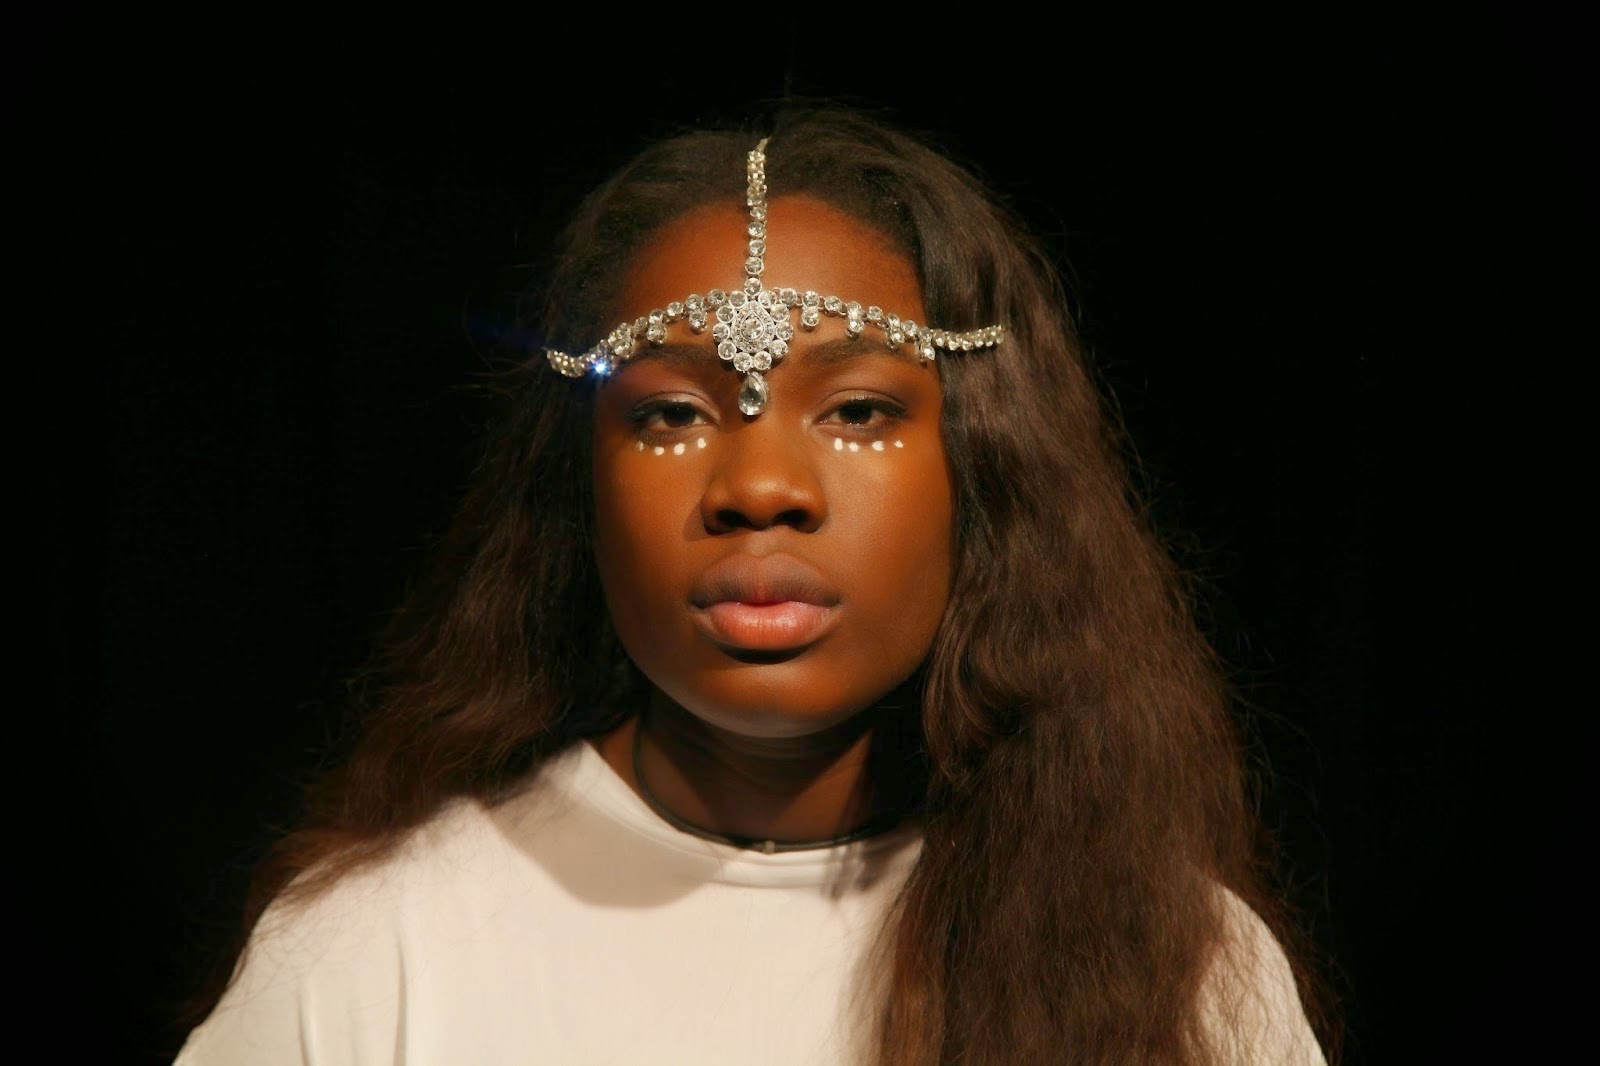
After looking at the footage, we were relieved to see that the transitions between VHS and HD looked fine - particularly how the colour of the VHS footage contrasted with the monochrome studio shots. However, we realised that it was very important that our artists having very strong looks, since the lighting and backdrops were very simple. So, for the black scenes (white costume) we ordered some interesting jewellery to liven up both looks of the artists on the next shoot.
After looking at the footage, we were relieved to see that the transitions between VHS and HD looked fine - particularly how the colour of the VHS footage contrasted with the monochrome studio shots. However, we realised that it was very important that our artists having very strong looks, since the lighting and backdrops were very simple. So, for the black scenes (white costume) we ordered some interesting jewellery to liven up both looks of the artists on the next shoot.
 |
| White Eyeliner |
 |
| Fake Septum Piercing |
 |
| Male surfer beads |
 |
| Ring |
 |
| Headress |
 |
| White dresss |
Studio Session - 13/11/2014
Our objective for this shoot was to get all the shots using the white background and the black costumes
Changes:
We slightly altered my costume as I didn't feel comfortable wearing a tight crop top and a midi skirt and the new costume created a stronger aesthetic (see developed costume post). This was easy to do as I owned the dress I wanted to wear already.
Both Josh and I had on our festival wristbands from the Summer Holidays and in order to create a look of a new artists, we had to cut them off (it was quite upsetting).
Preparation:
Once all the light was set up and amendments had been made to the white backdrop, I think the shoot ran quite smoothly.
We successfully got all the shots we wanted and even some of the studio promo shots (below are the unedited versions).
Changes:
We slightly altered my costume as I didn't feel comfortable wearing a tight crop top and a midi skirt and the new costume created a stronger aesthetic (see developed costume post). This was easy to do as I owned the dress I wanted to wear already.
Both Josh and I had on our festival wristbands from the Summer Holidays and in order to create a look of a new artists, we had to cut them off (it was quite upsetting).
 |
| Cutting off wrtistband |
Preparation:
Prior to the shoot, our teacher had shown us a way in which to do Josh's hair to achieve a "neat but slightly scruffy look." Josh also found some makeup which matched his skin tone and had learnt a technique how to put it on well for maximum coverage with a natural finish. Both of these things made it easy to do makeup.
 |
| Hair tutorial |
 |
| Applying Makeup |
Once all the light was set up and amendments had been made to the white backdrop, I think the shoot ran quite smoothly.
 |
| Fixing backdrop |
We successfully got all the shots we wanted and even some of the studio promo shots (below are the unedited versions).
From this shoot, we learnt that makeup and adjusting the lighting takes a little longer than we estimated and so for the next shoot we will factor this in in order to make an accurate shootboard.
Thursday 13 November 2014
Update: Costume and Makeup
Vivian:
After trying on some of the costumes, I realised I did not feel very comfortable wearing a tight top and skirt and this could impede upon my performance. We also decided, that we think our audience would be more interested in our artists as actual artists and less focused on things like our sex appeal.
I tried on a few new outfits:
 We ordered this netted top from www.boohoo.com, to wear with a black top underneath and black jeans. On camera, it looked fine, but the netted top was too tight and I felt conscious of how it looked on camera as I didn't feel very comfortable it in, so we decided to scrap this outfit.
 I also brought in this dress I had with fishnet tights, it turned out to be spot on. It had the netted mesh detail that we wanted on the shoulders, and it was loose so I felt comfortable in it aswell. It also looked cool and on trend, so I changed my outfit to this.
Josh tried on his black outfit just before the shoot and it looked great, so these were our finished black outfits.


They looked very nice together

After trying on some of the costumes, I realised I did not feel very comfortable wearing a tight top and skirt and this could impede upon my performance. We also decided, that we think our audience would be more interested in our artists as actual artists and less focused on things like our sex appeal.
I tried on a few new outfits:
Josh tried on his black outfit just before the shoot and it looked great, so these were our finished black outfits.
They looked very nice together
We planned the white outfits to be practically identical to the black.
Tuesday 11 November 2014
Call Sheet

We had to make a call sheet for each shoot. It was useful as it provided a clear guide for who was needed, when they were needed, how to contact them if they weren't available and what was needed.
Studio and Location Shot List

We created a shot list to just have a guide on what shots will definitely need to be incorporated into the future shoot boards. Above you can see what is needed for the studio and what is also needed for the VHS footage and the shoot dates when we intend to capture some of this footage. Although its not detailed, it provides an outline for something that both cast and actors can look to and see where we are at, also getting it all down on paper provided clarity.
Costume and Makeup
Narrative:
We wanted the costumes for the narrative section to look naturalistic so we allowed Louis and Gina to wear what they thought was best. Prior to the shoot we would inform them of the location e.g; At home or Day out in London, so that they would just know to dress appropriately
Monday 10 November 2014
Shoot Board
After a few production meetings, we started to put together a shoot board. Deciding how to organise and when to do the shots in the studio was relatively easy because we knew exactly what we wanted to achieve and how the shots would look like. Also, we didn't have to factor in Ginas availability which made it slightly more flexible - and our allocated time in the studio meant we had something quite concrete to work around and it was a clear representation of how much time we had to achieve those shots.

If we were moving between different locations on one shoot, we found it useful to add in travel information (See Alexandra Palace Shoot Board) to ensure we stayed organised.
 |
| Chart of allocated studio times (my group are in the green highlighted areas) |
After being given this times, it has been quite simple to arrange shoot schedules which fit into the time slots; we just bare in mind the amount of time we have over a day or during a slot to make sure we do what is required efficiently.
To avoid continuity errors and thus make editing easier in post-production, we decided to film each shot to the full length of the track; although this was quite time consuming it provides us with security that we have quite a lot to work with when we edit, in case any errors arise. Doing this, all costume and choreography was kept the same - we only changed the background lighting.
We also created shootboards for the On Location shoots though these were more difficult to stick to. We wanted to capture an naturalistic relationship and we felt this would be slightly hindered by planning the shots, So instead, we included a picture to give us a visual reference which, accompanied by a brief description of of shot type and framing, would ensure we remembered to get certain specific shots without forcing the actors to stick to an entire planned performance.
 |
| Market day/China Town shootnoard |
 |
| Alexandra Palce Shoot Board |
Friday 7 November 2014
Footage Review - 5/11/2014
We reviewed the footage from the choreography shoot on the 5th and then edited it with some already captured VHS footage to start getting an idea on how the final video would shape up.
In the animatic we experimented with using the beat of the song for editing so we applied this to the test:
This video was very promising. Although we only have the LS establishing shot which looks quite boring now, when we are able to cut to different shot types on the beat- I feel like this is going to look very striking. Even from the short clip above that we produced, I can tell that it is going to have the style we want. My only issue are the black lines around the VHS shots due to the 4:3 ratio. I think the contrast in quality between the HD and VHS is strong enough, the black lines, for me, just look bad and are confusing.
Publicity Shots
The promo shots below are ones we aim to take in the studio on the days of shooting. This will allow the costume to remain the same and the lighting to only be slightly tweaked to adjust how the artists look on the day.
We also thought if possible, we could experiment with some shots near a body of water or lake to see how they look. This was brought about by looking at some images on Pinterest which we felt matched the style our artists would convey through their pictures.
 |
| Sketch of Studio Promo Shots |
I thought of the idea of a panorama image of a forest with the two artists dressed in all white in one of the far corners of the picture. Discussing with the group, we realised this would work great as a background image on the website and could maybe even be applied to the album cover. On our promo shoot we will take the panoramic style photos as well as some other shots so we have a variety of images to choose from. We feel that these shots will particularly connote the intense yet mysterious nature of the band.
 |
| Sketch of On Location Promo Shots |
We also thought if possible, we could experiment with some shots near a body of water or lake to see how they look. This was brought about by looking at some images on Pinterest which we felt matched the style our artists would convey through their pictures.
 |
| Sketch of Lake Shots |
 |
| Photos from Pinterest that gave us Inspiration |
Thursday 6 November 2014
Lighting and Set Design
After looking at some music videos we found that Aluna George's Just A Touch and Telana Gemini had that sort of lighting we would like to recreate in our video, so during our technical demonstration we tried to replicate some of this.
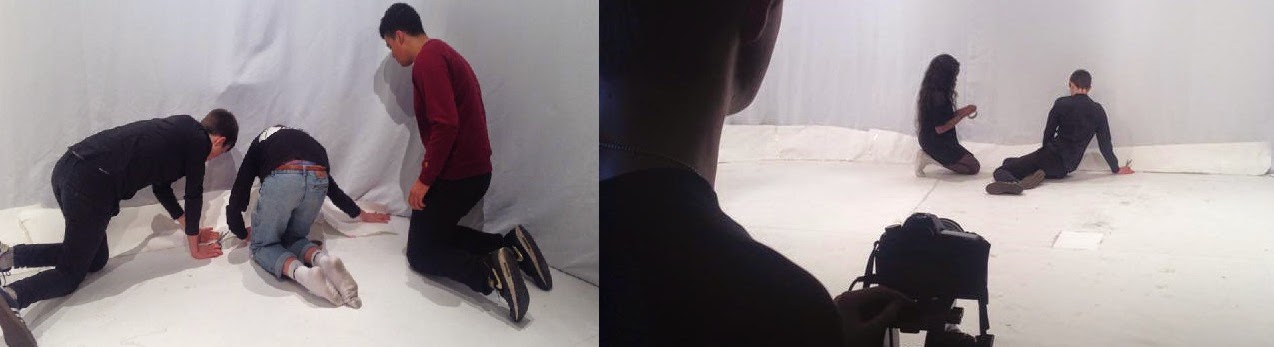
In the school studio, we used the Leap Frog lighting desk to play around with a variety of lighting settings, and captured footage of how they would come up on the camera on the Canon Video recorder.

Above are some images of us testing the lighting; back-lighting and flooding in a variety of colours/colour combinations. In the end we decided against coloured lighting because we couldn't achieve the infinity effect that we wanted to due to lack of light intensity. The black and white scenes looked really good and so we made them our backdrops. Since Josh and I are different skin colours it took a while to find lighting that complimented us without making Josh look too washed our me too dark, however eventually we got there.
Below is a video of us testing out some of the lighting:
 |
| (Left hand AlunaGeorge, right hand side Telana) |
Above are some images of us testing the lighting; back-lighting and flooding in a variety of colours/colour combinations. In the end we decided against coloured lighting because we couldn't achieve the infinity effect that we wanted to due to lack of light intensity. The black and white scenes looked really good and so we made them our backdrops. Since Josh and I are different skin colours it took a while to find lighting that complimented us without making Josh look too washed our me too dark, however eventually we got there.
Below is a video of us testing out some of the lighting:
Casting
We needed two people (white male and black female) to be the group NTLS and luckily I was able to fill the role of the female artist and Josh was ideal for this and had the performance abilities.
 Louis Caldwell
Age: 17
Gender: Male
Role: Boyfriend
We cast Louis for various reasons:
- He is 6ft 2; significantly taller than Gina and so aesthetically, a boyfriend that is taller than the girlfriend is more pleasing.
- He is a good looking male so a female audience would be more interested in the video
- Gina is his girlfriend in real life so they are able to convey a loving relationship naturally
- He is in our group and so is committed and happy to work
 Gina Corrieri
Age: 18
Gender: Female
Role: Girlfriend
We cast Gina for various reasons:
- She is 5ft ; so her shorter height compliments Louis.
- She is Louis girlfriend in real life and does GCSE Drama so feels comfortable behind the camera and it will look naturalistic
- She has signed a contract agreeing to work the dates needed
- She is a good looking female so will appeal to a male audience
 Joshua Brooks
Age: 17
Gender: Male
Role: NTLS male band member
Working to the strengths of our group and what we wanted the artist NTLS to look like, Josh was ideal for the male lead band member.

Vivian Oparah
Age: 17
Gender: Female
Role: NTLS female band member
Working to the strengths of our group and what we wanted the artist NTLS to look like, I fit well into the female lead band member.
Age: 17
Gender: Male
Role: Boyfriend
We cast Louis for various reasons:
- He is 6ft 2; significantly taller than Gina and so aesthetically, a boyfriend that is taller than the girlfriend is more pleasing.
- He is a good looking male so a female audience would be more interested in the video
- Gina is his girlfriend in real life so they are able to convey a loving relationship naturally
- He is in our group and so is committed and happy to work
Age: 18
Gender: Female
Role: Girlfriend
We cast Gina for various reasons:
- She is 5ft ; so her shorter height compliments Louis.
- She is Louis girlfriend in real life and does GCSE Drama so feels comfortable behind the camera and it will look naturalistic
- She has signed a contract agreeing to work the dates needed
- She is a good looking female so will appeal to a male audience
Age: 17
Gender: Male
Role: NTLS male band member
Working to the strengths of our group and what we wanted the artist NTLS to look like, Josh was ideal for the male lead band member.
Vivian Oparah
Age: 17
Gender: Female
Role: NTLS female band member
Working to the strengths of our group and what we wanted the artist NTLS to look like, I fit well into the female lead band member.
Wednesday 5 November 2014
Studio Session - 5/11/2014
For our very first studio session, we thought it would be best to run through the choreography of the music video. We also used this time to finalise our lighting set-ups and mark out on the floor where our props needed to go or where we needed to stand. The session was quite time restricted so we decided against fully getting into our costume.
I think this was really helpful because it meant no time we wasted on the next shoot as we knew our choreography.
Tuesday 4 November 2014
Choreography Rehearsals
The choreography for the video was quite straight forward as it had been decided whilst doing our storyboard and animatic. However, for the sake of clarity, we printed off the lyrics and beneath each one in bold we wrote in which action corresponded to the line.

Hopefully, this will help the first shoot run more smoothly.
Monday 3 November 2014
Health and Safety
To avoid damaging equipment, injuring ourselves or anyone else there were some health and safety rules we were informed of before our studio sessions:

To stay safe On Location, our main thing to keep in mind was being streetwise i.e. carrying out general street safety procedures and being aware that we were carrying around a lot of expensive equipment (and so avoiding advertising it or not handling it with care)
Subscribe to:
Posts (Atom)